I’ve been touring with the same pedal board for 2 years now. That’s given me plenty of time to come up with ways to improve my pedal board. I know exactly what works and what doesn’t work with my current board.
And with all the down time we’re having right now, I figured it was the perfect time to redo my touring board. This is part 1 of a 2 part blog series where we’ll walk through the pedal board re-build.
In part 1, we’ll take a detailed look at my current pedal board, then see where I hope to make improvements with my new board.
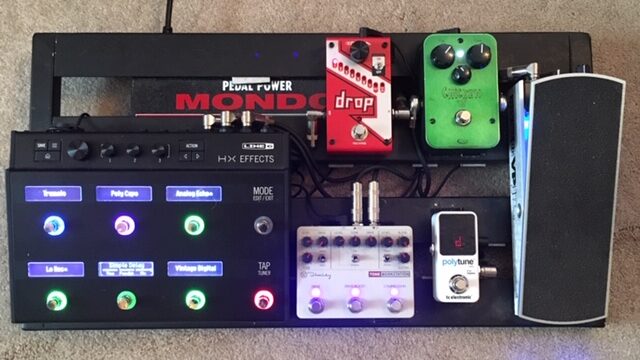
Here you can see my touring board as it is currently laid out. Here’s the signal flow:
- The board is powered by a Voodoo Labs Pedal Power Mondo mounted underneath
- From the guitar, I plug directly into the Ernie Ball VP Jr (modded by Thru-Tone), aux out into the Polytune Mini
- Into the Digitech Drop
- Into the Line6 HX Effects
- The Line6 FX loop send goes to the Keeley Tone Workstation
- Then into the Rockett Chicken Soup
- Back into the return of the Line6
- From there the signal goes to my amp
Placing my drives in the effects loop of the HX Effects gives me the ability to route certain effects (fuzz, mods, etc) from the Line6 before my drives, while keeping other effects (delays, reverbs, etc) after my drives.
All in all, it’s a pretty simple rig, but also gives me tons of sounds and routing options to work with.
The Rundown
Now let’s take a look at how I’m using each pedal and why I chose each pedal for this rig.
The Ernie Ball VP Jr has been a long time favorite of mine, and the Thru-Tone mod is truly a game changer. Gone are the days of calibration drift, string breakage, and tone suck. Also, the bright blue LED looks really cool on stage (half the battle, right?).
I use the Digitech Drop for songs that are in Eb. This eliminates a couple guitar changes throughout our set. Frank Foster likes to move fast between songs, so this pedal has been great for that.
The Keeley Workstation was appealing because it packs so much into a small pedal…compression, clean boost, Marshall-esque overdrive, and a TS-style drive. I’ve used the TS as my solo boost and the compression mainly on cleaner tones.
The Rockett Chicken Soup is a take on the Nobels ODR-1. It’s been my core drive tone on every pedal board I’ve had since I got it 7 years ago. If you’ve heard me play with Frank Foster, you’ve heard this pedal.
The HX Effects covers everything else for me. I mainly use it for modulation, delay, and reverb. But I’ve occasionally used it for fuzz sounds as well.
The Good
Here are the things that I do like about this board:
- It’s fairly versatile, thanks especially to the tons of effects options in the HX Effects.
- It’s rock solid and dependable, thanks to the wiring job my friend Kevin Shaw did.
- It’s not too big/heavy.
- The simplicity of the layout makes dialing in tones quick and easy.
The Bad
Here’s what I don’t like about the board.
- The signal flow. I’d rather have my volume pedal after my drives. Also, I’d rather have my compressor after my main overdrive, but before my boost pedal. The Keeley won’t allow for that.
- I love the Rockett Chicken Soup, but I feel limited by not having a lower gain drive pedal as a second core tone for the cleaner tones I need. I’ve been using my volume knob to clean things up, but I’d rather have a second drive pedal to handle lower gain sounds.
- The Keeley Tone Workstation isn’t quite cutting it. Don’t get me wrong, it’s a great pedal. But it doesn’t fit the bill for my current needs. The main problem I have is how close the switches are to one another. On a dark stage in the heat of battle (and in boots), it’s hard to hit the switch you’re going for without hitting the next one over as well. It’s better suited to the studio for that reason. Also, 90% of the time I’m only using it for the TS style drive for a solo boost, so it’s not very economical.
With all of these factors in mind, I’ve set out to put together a new and improved touring pedal board. In Part 2 of this blog series we’ll take a look at the new board and see how each problem area was dealt with and solved. Stay tuned.

0 Comments