In Part 1 of this blog series we walked through the pedal board that I’ve toured with for the past 2 years. We looked at what I liked and what I didn’t like about the board.
Now in Part 2 we’ll take a detailed look at the new board I’ll be touring with in 2021 and beyond. Here it is, freshly wired up by my friend Kevin Shaw.
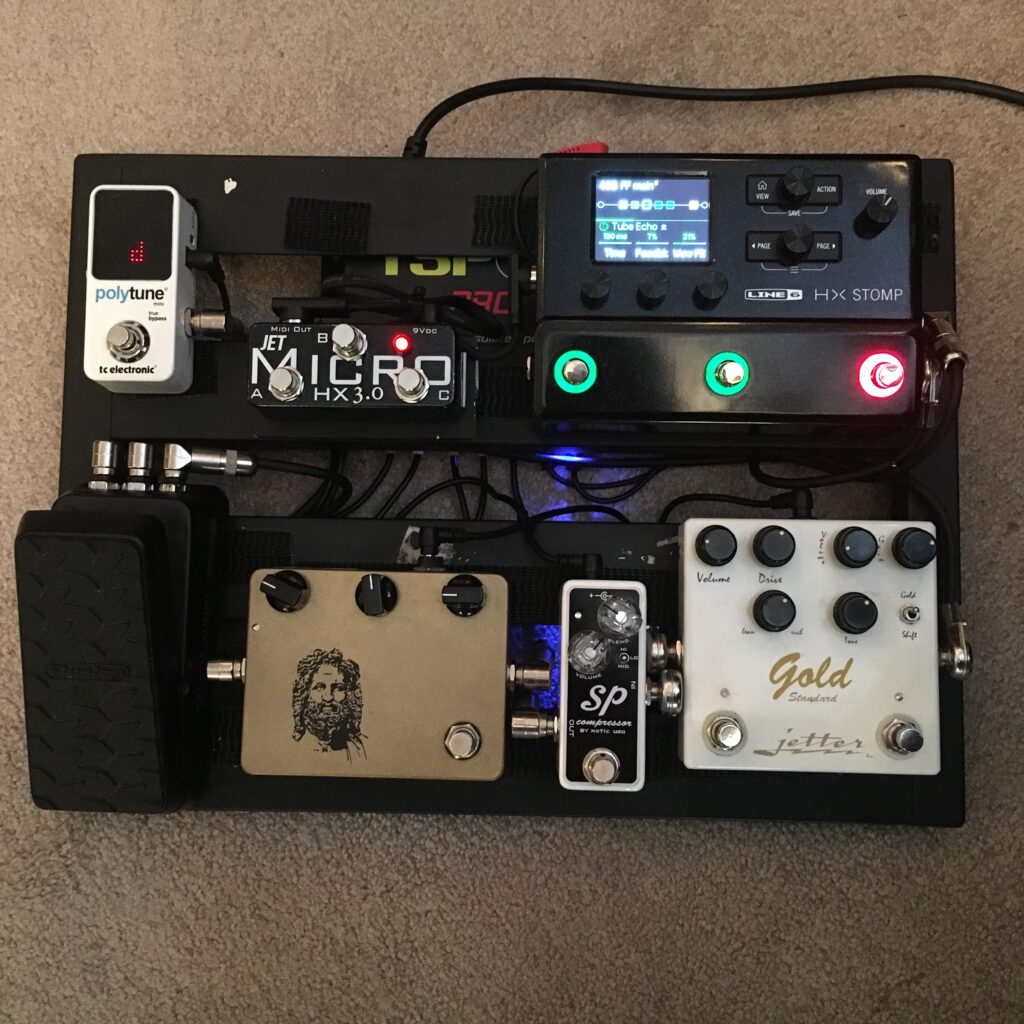
The first thing you’ll probably notice is that it’s significantly smaller than the old board. It’s also a bit simpler in it’s layout.
Signal Path
- The board itself in an old Pedaltrain PT Jr. and everything is powered by a Truetone CS7.
- From the guitar I plug into the Line6 HX Stomp
- The Jet Micro HX 3.0 is sending MIDI data to control the HX Stomp
- From the HX Stomp FX Send the signal goes into the Jetter Gold Standard
- Next up is the Xotic SP Compressor
- Then into the Mythos Mjolnir (2015 version)
- Next is the Dunlop Volume X Mini which sends an aux out to the TC Electronic Polytune Mini
- From there I plug into the FX Return of the HX Stomp
- From the HX Stomp I plug into the front of the amp
I’m using the FX loop on the HX Stomp in the exact same way that I used the loop in the HX Effects on my old board. Certain effects (fuzz, mods, etc) can be routed before my drives, while others (delays, reverbs, etc) can be routed after my drives and volume pedal.
The Rundown
Here’s a quick look at how I plan on using each of the pedals on the board, and why I chose each one.
First off let’s talk about the HX Stomp. This pedal replaced the HX Effects from my previous board. It contains all the same effects but with the addition of amp and cab blocks. This allows me to have presets ready to go in case my amp goes down or I ever find myself unable to play through a loud amp. It also gives me the ability to record when I’m on the road.
The Jet Micro MIDI controller gives me tons of flexibility in terms of control when playing live. It really opens up the functionality of the HX Stomp. I’ll be using it to switch effects on and off, scroll through presets, and also to send control messages to certain effects blocks in the HX Stomp. For example, I have a plate reverb block that’s set up to be a short decay, lower mix reverb just to add a bit of depth to my tone. The controller message sent from the Jet Micro lengthens the decay and raises the mix on the reverb giving me a lush, long reverb…all from one block on the HX Stomp.
The primary effects I’ll be using from the HX Stomp are delays and reverbs, with the occasional modulation effect (tremolo, chorus, vibrato).
A game changer with the newest update to the HX firmware is the new polyphonic pitch effects. This allows me to eliminate the Digitech Drop pedal for the songs we do in Eb. I simply created a preset with a “poly capo” block placed before the FX loop in the HX Stomp that drops the pitch a semitone. Boom. I did some A/B testing with the new “poly capo” effect and the Digitech Drop and was amazed to find that the HX Stomp actually sounds better than the Digitech.
The Jetter Gold Standard is an old favorite of mine that used to be my primary drive pedal before I found the Rockett Chicken Soup. I decided to give the Chicken Soup a break and mix things up with the Jetter. One thing I love about the Gold Standard is that each side sounds like another channel on my amp, not like a drive pedal. The left side is a fantastic low/mid gain sound, and the right side has a bit more gain and a really useful “shift” switch to beef up the mids if needed.
I’ll essentially be using the Gold Standard as my always on drive sounds…the left side for the lower gain sounds and the right side for the more rockin’ stuff.
I placed the Xotic SP Compressor after the Gold Standard. One of the things that bothered me about my previous board was the placement of the compressor (and boost) before my main overdrive. So I fixed that on this board. Another thing I love about the SP Compressor is the blend knob. Now I can get everything from a super squashed sound to a really transparent compression sound.
Placing the compressor after the drive allows my picking dynamics and volume knob adjustments from the guitar to sound dynamic in a way similar to having no compressor on at all. So if I pick hard, the drive pedal gets dirtier. And if I pick lighter, the drive pedal is cleaner. But with the compressor behind the drive, it evens out the volume across the clean/dirty continuum. I always find that with a compressor before overdrive it flattens out that dynamic nature of the drive, and everything kind of sounds the same regardless of how I vary my picking dynamics.
Next is the Mythos Mjolnir overdrive. It’s basically a Klon clone but with the mid boost shifted up a bit (at least to my ears). I’ll be using this as my solo boost. Placing it after the Gold Standard and the compressor allows me to get a nice volume boost and not just an increase in saturation for solos.
The volume pedal is after all the gain boxes on this board, not in front as on my previous board. Now I can do volume swells without changing the gain structure of my tone. If I want a cleaner tone, I can make that happen with the volume knob on my guitar (which sounds better than a volume pedal to my ears).
The HX Stomp has a great tuner, but I opted to keep a Polytune Mini on this board. In the heat of battle, it’s much easier to just roll back the volume pedal and make quick tuning adjustments than holding the tap button for 2 seconds to access the tuner on the HX Stomp. Plus, with the Polytune I can monitor my tuning while I’m playing. For a tuning/intonation stickler that’s a game changer.
So there it is – my small, lightweight, incredibly versatile board. Effects only, amp/cab sims, recording interface…this thing does it all. And it fits easily into a carry on size suitcase if I ever need to fly with it.
Let me know if you have any questions or comments. And if you made it this far, thanks! It’s nice to know there are other gear geeks out there.

0 Comments